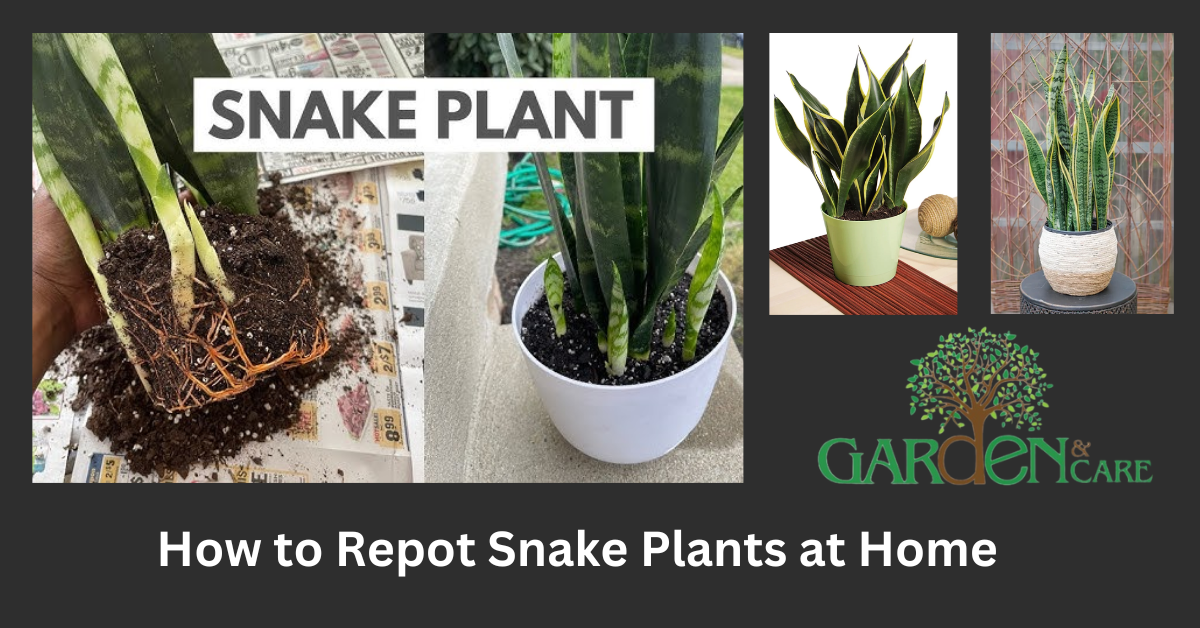
There’s something oddly satisfying about watching your snake plant thrive—and then realizing it’s outgrowing its pot like a kid bursting out of their shoes. I’ve been there, looking at those stiff, elegant leaves and thinking, “Okay, it’s time to repot this snake plant before it turns into a jungle in a teacup.” Whether you’re new to houseplants or just dipping your toes into indoor plant care, learning how to repot a snake plant is easier than you might think.
Over the years, I’ve picked up a few tricks—from spotting a root-bound snake plant to choosing the best soil that drains just right. It’s not just about transplanting snake plant roots; it’s about giving it room to breathe and grow. In this guide, I’ll walk you through every step, from choosing the right cactus soil mix to repotting snake plant pups the right way. Let’s get your Sansevieria settled into a happy new home, shall we?
When to Repot Snake Plants
Something is rewarding about seeing your snake plant thrive—those tall, sculptural leaves standing proud like green spears. But sooner or later, you might notice it’s outgrowing its pot, kind of like a kid whose shoes suddenly don’t fit anymore. I’ve been in that exact spot, staring at my snake plant as it pushed against the edges of its little container and thinking, “Okay, time for an upgrade!” If your plant is looking cramped or the roots are poking out the bottom, it’s probably time to repot.
👉 Signs your snake plant needs repotting:
- Roots are circling the inside of the pot
- Roots are growing out of the drainage holes
- The plant looks crowded or top-heavy
- Water runs straight through the pot, or the soil dries out too quickly
Don’t worry—repotting a snake plant isn’t nearly as complicated as it might sound. Whether you’re brand new to houseplants or just starting to explore indoor gardening, this is a simple and rewarding task. Over the years, I’ve repotted quite a few snake plants and learned some helpful tips along the way.
✅ Helpful repotting tips:
- Gently remove the plant without damaging the roots
- Shake off old soil and trim any dead or mushy roots
- Choose a pot that’s 1–2 inches larger than the current one
One of the most important parts of repotting is choosing the right soil. Snake plants don’t like to sit in wet dirt, so a well-draining mix—like cactus or succulent soil—is perfect. You want something that dries out between waterings and keeps those roots happy.
🪴 Ideal soil mix:
- Cactus or succulent soil
- Add perlite or sand for extra drainage (optional)
And if you’ve got little baby snake plants (called pups), this is a great time to separate and repot them too!
🌱 When to divide snake plant pups:
- Pups have their own root system
- They’re big enough to survive on their own
- You want to propagate or declutter your main plant
In this step-by-step guide, I’ll show you exactly how to repot your snake plant, from prepping the new pot to gently freeing the roots and giving your plant its fresh start. With a little care, your Sansevieria will settle into its new home and keep growing strong.
Let’s get started—your snake plant is going to love its new digs!
When to Repot a Snake Plant
Snake plants are known for being super low-maintenance—that’s part of why we love them! But even the toughest houseplants need a little refresh from time to time. If your snake plant is looking a bit cramped, it could be a sign that it’s ready for a new pot.
One big clue? Roots poking out of the drainage holes or circling the bottom of the pot. You might also notice the plant leaning or becoming top-heavy. That usually means it’s root-bound and needs more space to grow.
🪴 Signs it’s time to repot:
- Roots growing out of the bottom
- Soil dries out way too fast
- The plant looks like it’s tipping over
- Slowed growth or yellowing leaves
The ideal time to repot your snake plant is in spring or early summer, when it’s in its active growing phase. Repotting during this time helps the plant recover quickly and adjust to its new home without too much stress.
🌿 Best time to repot:
- Spring or early summer
- When the plant is actively growing
- After you notice signs of being root-bound
Keep an eye on your plant’s signals—repotting at the right time can help your Sansevieria stay happy, healthy, and thriving for years to come!
What types of tools you Needed
Before you get started, gather a few simple tools to make the process smoother. I always use a pot that’s about 1–2 inches wider than the current one, plus a cactus soil mix that drains like a dream. That’s the best soil for snake plants, hands down—it keeps roots healthy and happy.
Don’t forget a clean, sharp knife if you plan on dividing or repotting snake plant pups. I also recommend using gloves if your skin’s sensitive—the leaves can be a bit sharp. Prep everything in advance, and the whole thing feels more like a relaxing Sunday project than a chore.
How to Repot a Snake Plant
Ready to give your snake plant a fresh start? Repotting might sound tricky, but it’s a simple and satisfying process. Just follow these easy steps, and your Sansevieria will be settling into its new home in no time!
🛠️ Step-by-step guide to repotting:
- Water the plant a day before – This softens the soil and makes it easier to remove the plant without damaging the roots.
- Gently remove the plant – Hold it at the base (not the leaves) and slide it out of the old pot.
- Inspect the roots – If they’re tightly coiled or circling the pot, it’s a sign your plant was root-bound.
- Loosen the root ball – Gently untangle the roots with your fingers to encourage healthy growth.
- Choose a new pot – Go for one that’s 1–2 inches larger and has drainage holes.
- Add fresh soil mix – Use a well-draining mix, like cactus or succulent soil.
- Position the plant – Center it in the pot, then fill around the sides with soil. Lightly press down to secure it.
- Water once – Give it a light watering to help the soil settle, then let your plant rest in a bright, indirect light spot.
And that’s it! Just like moving into a bigger place, your snake plant will appreciate the extra room to stretch out and grow. 🌿
Dividing & Repotting Snake Plant Pups
One of the coolest parts about owning snake plants is how they multiply. Those little offshoots—aka pups—pop up like baby plant surprises. When you’re repotting, it’s the perfect chance to divide them and grow even more greenery for your home (or to share with a friend).
Use a clean knife to separate the pups from the root ball. Just be gentle and don’t take more than one-third of the plant—it needs to keep its strength. Repot each pup using the same cactus soil mix and water lightly to help them settle in.
Aftercare Tips for a Healthy Snake Plant
You’ve repotted your snake plant—nice work! Now it’s time to help it settle into its new home. The good news? Snake plants are super resilient, but a little aftercare goes a long way.
First things first, give your plant a chance to rest. It might look a little shocked at first (totally normal!), but it’ll perk up soon with the right conditions.
🌞 Light & Placement:
- Keep it in a bright spot with indirect light
- Avoid direct sunlight right after repotting—it can be too harsh
💧 Watering Tips:
- Hold off on watering again for about a week
- Let the soil dry out completely between waterings
- Overwatering is a common mistake and can cause root rot
🪴 General Aftercare:
- Wipe down the leaves gently if they’re dusty
- Avoid fertilizing for a few weeks—give the roots time to adjust
- Keep the room temperature steady (between 60–85°F or 16–29°C)
🌿 Stick to a simple routine:
- Bright light
- Minimal watering
- Occasional wipe-downs
With just a bit of patience, your snake plant will bounce back and thrive. It’s one of those low-maintenance beauties that rewards you for not doing too much. In a few weeks, it’ll be growing strong and showing off those gorgeous, upright leaves again!
Troubleshooting: Common Repotting Issues
Even with careful repotting, your snake plant might show a few stress signals—but don’t panic! Most issues are easy to fix once you know what to look for.
🌿 Common post-repotting problems:
- Drooping leaves – A normal stress reaction. Just give your plant time to adjust.
- Yellowing leaves – Usually caused by overwatering or poor drainage.
- Rotting roots – A serious issue often due to soggy soil. Always use a well-draining mix like cactus or succulent soil.
🛠️ Quick fixes:
- Let the soil dry out between waterings
- Ensure the pot has drainage holes
- Avoid placing the plant in harsh direct sunlight right after repotting
Your snake plant will bounce back with a little patience and proper care. Just keep an eye on the signs—it’ll let you know what it needs to thrive!
Final Thoughts
Repotting a snake plant isn’t just good for the plant—it’s oddly calming for you, too. There’s something about the rhythm of caring for something green and quiet that just grounds you. And once you’ve done it once, it becomes second nature.
Remember, it’s not about perfection. It’s about noticing when your plant needs space and giving it the care it deserves. So go ahead, repot that snake plant—it might just be the most peaceful thing you do all week.
Leave a Reply